Saturday, 25 July 2015
UE MINI BOOM Bluetooth Speaker
Wireless stereo speakers consist of two units: a principal speaker unit combining the loudspeaker itself using the RF receiver, as well as RF transmitter unit. The transmitter connects for your audio production of any audio devices UE MINI BOOM Bluetooth Speaker for example hi-fi equipment, televisions, computers, ipods, etc. An Audio plug is normally used to make this happen. The receiver lies the place that the listener wants the sound being, giving the freedom to advance the wireless stereo speakers around without the need of using cables. The receiver/speaker unit generally contains a guitar amp to improve the audio signal to the loudspeaker it's powered either by batteries or by an AC electric outlet. Batteries last for three or four hours some wireless stereo speakers are operated by rechargeable batteries.
iPhone 6 Slow Charging
Quick battery pack lifetime is amongst the common complications right now, whichever cellular phone you use. Nonetheless, which is not the sole trouble, since there's sluggish getting difficulty likewise, as well as it could be actually aggravating. In this post, you can observe 5 approaches to fix iphone 3gs 6 sluggish getting concern, and you can be sure that one of these alternatives will help you to charge ones product swifter.
In order to impose your own apple iphone more rapidly, facts shows that when you convert the device away - so it doesn’t throw away electricity whilst asking : that will limit the getting occasion. If you don’t desire to let down your own cell phone, no less than place the new iphone 4 within the "airplane mode". Of which task is a snap.
Monday, 6 July 2015
Step by Step How to fix IPhone 6 Not Connecting to Wifi
You need to connect to the internet for you to use most of its features. Your phone needs to be connected to the Wi-Fi before it could have access to the internet. This is because several features of the phone need constant updating and this cannot be possible unless it connects to the internet, as these features were only available on the internet.
You can now see that the efficiency of your phone largely depends on its Wi-Fi connection. Connectivity problem is the greatest challenge confronting iPhone 6 users worldwide.
This Guide is a basic guide of the one found on MacCrunch about iPhone 6 Not Connecting to Wifi
However, there are various ways out of the problem. This tutorial would simply take you by the hands and guide you on how to fix the problem permanently so that your phone would connect to the internet. These methods are simple and owners of the mobile phone can do them. You do not need to be a technical expert before you can try any of the tutorial described below and solve the connectivity issue.
Here are the simple steps, which you can take today to solve this problem:
1. Try to reset your mobile phone network setting
The first thing that you need to do to connect your iPhone 6 is to reset its network settings. Here are the simple steps to reset it.
Go to the setting tab in your iPhone 6 mobile device
Choose the General tab and select the Reset option tab
Reset the Network Settings
When you are through with this process, you would observe that the phone would reboot itself. If there were anything you saved in the system such as a password and other things, these would simply wipe away. You may be required to input the details again to use your iPhone 6 Wi-Fi services.
2. Disabling the Wi-Fi settings
If the first step above does not solve your problem, you can try the second method. This method, which is also simple and easy to do, can restore connectivity problems in many mobile phones that were not connecting to Wi-Fi. Here are the simple procedures you can follow:
Reach out to your Settings menu of your phone
Get to the privacy tab and look for the Location Services
Scroll down the options and choose the System Services, and select the Wi-Fi Networking option
Select the Switch and this would automatically disable Wi-Fi settings of your phone.
When you have done the steps above, you have to turn off your mobile phone and reboot it. Try to connect to the internet using your Wi-Fi. This could fix the connectivity problem.
3. Factory Resetting your Phone
If the previous steps you took could solve the connectivity issue, the third solution that you can try is to carryout factory resetting of your phone. You can do this following the simple instructions below:
Select your phone Settings option
Select the General tab and subsequently the Reset option
Click on the Erase all Content and Setting, at this stage you would be required to enter your pass code if you already have one, but where none was never used, you have to proceed with the setting
Click on Erase iPhone option and this would approve the reset.
However, you should know that this step is not as fast as previous steps as it could take more time than you envisaged. The speed is usually affected by the services and apps you already installed in your mobile device. If this process prolongs, you should not be worried over that, as it is a normal process.
4. Try Resetting from iTunes
Another solution to your iPhone connectivity problem is resetting it through your iTunes. You can do this simply by connecting to your computer and use your iTunes to get the device Reset. This might help resolve that problem for you. Here are the simple steps you can take to do that:First, you have to get your phone connected to your computer
Secondly, get to your iTunes and choose the phone, which you would notice in the dashboard
Thirdly, reach out to restore button, which you would see from the Summary tab
Allow a little time for this process to be completed and restart your mobile phone
When you observe the Hello Screen, set the iPhone using the instructions, which would appear in your screen
It is possible that this method would work for you, because it has worked for other people who have faced the same type of problem with their mobile phone Wi-Fi connection, it could work for you as well.
5. Updating your iOS
It is possible that you are encountering the problem because you have not upgraded to the latest version of iOS operating system. This is usually the case with those who are still using the older version of the iPhone mobile device. It is possible that the problem could be easily solved by migrating to the modern operating system. When you have migrated, you would see that the problem could be solved.
Conclusion
There is no doubt that you would permanently solve your iPhone 6 Wi-Fi connectivity problem by the time you try the five different methods demonstrated above. These are the known solutions to the problem.
Remember that you have to take these steps one after another. You have to try a new approach if the previous approaches have failed to work for you.
If after you have tried all the methods enumerated above, and you still find it difficult to resolve the problem then you might consider visiting the nearest apple store within you, as they would be in a better position to find the final solution to the problem. The problem might be technical, which would be solved by treating the technical problem.
Apple technician would check your phone to ensure that everything was working perfectly.
Saturday, 4 July 2015
Step by Step How to Fix IPhone 6 Getting Hot Fast Problem

Solution Number 1 YOUR APPARATUS
It might aid, although this isn't difficult in any way. Just reboot your device by keeping and pushing Sleep and Aftermath switches. Select to switch off your I-phone when you start to see the red slider. After the device is off, duplicate what you did so that you can to show on the phone.Solution Number 2 OFF UPDATES
To get this done, visit Configurations and select App-Store & I tunes. Locate software upgrades, automated downloads, and select away. Your telephone number will be cooled down by it.Solution Number 3 OFF ACTIONS IN THE BACKGROUND
You'll find lots of programs that can operate in the the back ground, also if they are not used by you in the minute. It could create the problem, which is the reason you need to flip away them. Visit Options, Basic, and select Background Program Refresh. Place to off.Solution Number 4: RELEASE THE RAM
A lot of people often overlook most likely and the basic truth the greatest defect of the apparatus- I-phone 6 has just 1 GB MEMORY. You should free the Memory up sometimes, which might aid. There are many methods to do this. Apparent the cache with program specially-designed for it (you will find lots of programs you will see in the Appstore), un-install programs you may not utilize, and remove the documents you do not want. This way you are going to free the Memory up, the warmth problem will be-gone, as well as your device will not work far worse.Solution Number 5 YOUR I-PHONE 6 TO FACTORY SETTINGS ITUNES
Recover to factory settings can be used as the best option if you possess the problem by means of your apparatus. So that you can get this done, back-up most of the info. Link the telephone by means of your pc, after the I-tunes seems and find the device. Visit Overview Cell, and locate Recover choice. Click on it and after that again to finish the activity. Articles and all information in your I-phone 6 is likely to be removed, and after the pleasant screen is up, set your telephone number up .Some consumers said that acquiring warm problem seems in the start, when the telephone is purchased by you and install most of the programs and things. As soon as you install whatever you needed, it could vanish. Yet, with one of these 5 Methods to repair I-phone 6 getting warm quick issue, you'll be capable of using your device without any problems, plus it is going to perform perfectly.
Step by Step How to Fix IPhone 5 Network/Cellular Radio Issues

Solution Number 1 PLANE MODE
This option is the one that is most straightforward, plus it can let you eliminate issues you've.Solution Number 2 IOS
One of many matters each person that is iPhone should be thinking about is the reality that iOS needs to be upgraded to the most up-to-date version. Ensure that you always check out this, and get it done, when the upgrade was not performed by you. It's going to fix some other glitches, and these problems at the same time. Ensure that you backup your iphone5 before you do something. Select Update and Options.Solution Number 3 SYSTEM SETTINGS
This can be among the 5 methods to repair iphone-5 System/Mobile Stereo Problems which will aid. Regardless of who the provider is, attempt this, and ideally, you are going to repair the issue. Available visit Basic, and iphone5 Options. After this, select Re-Set System Settings, and after that alternative Re-Set. You are going to notice the option that is red-colored. So that you can validate the activity push on it.Solution Number 4: ADD YOUR SIM CARD
This could function as important, and is really straightforward. Take away out of your device, and put it again.Solution Number 5: IPHONE5 RESTORE
Ensure that you backup all of the information you've got in your apparatus in the event that you would like to conduct this task. Locate Reset, and measures which can be needed are to select Options, Basic. Faucet on Settings and Erase Content as soon as you are doing so. Support the activity. After this, set your iPhone up as a brand new apparatus.These options may most likely fix the problems forever. Otherwise, get in touch with your provider, plus it will be solved by them.
Step by Step How to Fix IPhone 5 White Screen Of Death
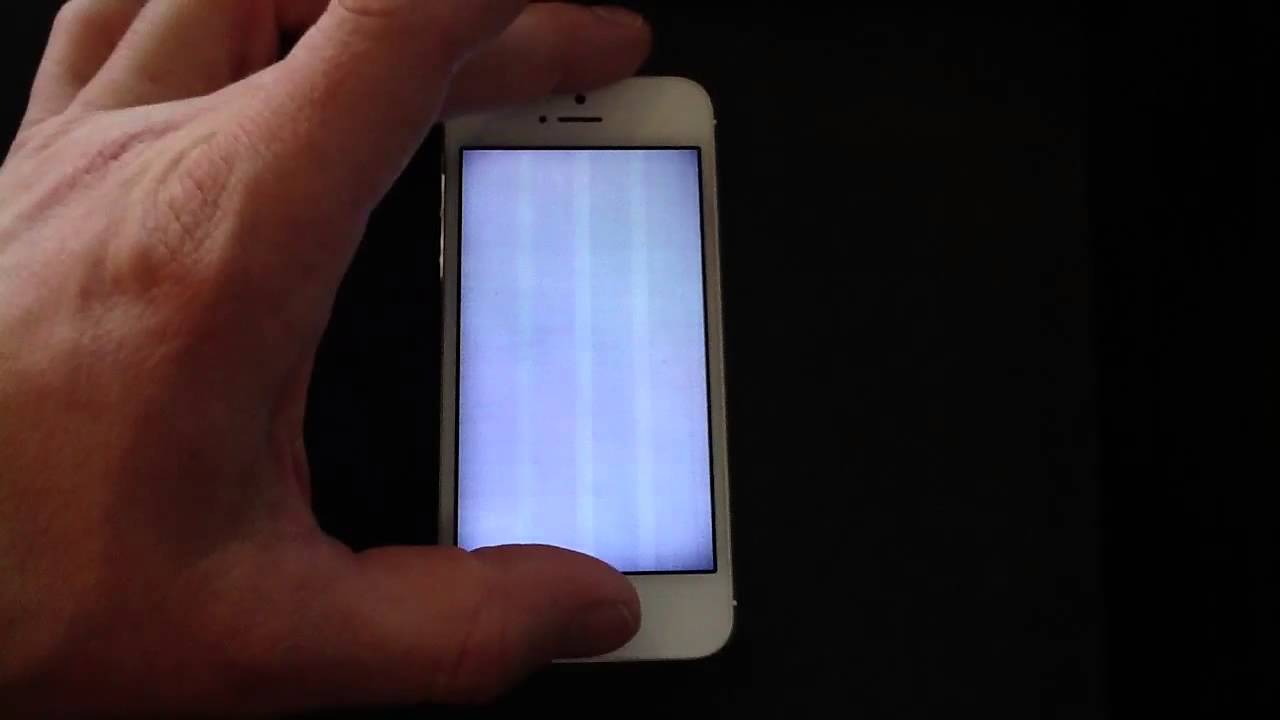
Solution Number 1. PUSH A FEW BUTTONS IN EXACTLY THE SAME TIME
Push on the switches in this sequence of the iPhone: HouseVolume upSlumber/energy and hold-all together. This might have some time, however, the display that is white will disappear, and shortly as it occurs, launch the switches and wait of one minute before the Apple logo pops up and the I-phone will typically boot up.Solution Number 2. TAKE AWAY THE BATTERY
After white display appears, fast as potential open the I-phone, remove the battery show, boot up your telephone number again and then set it right back.Solution Number 3. ITUNES
Then push and maintain "House" and "Sleep/Wake" option in once.Solution Number 4. THREE HANDS TRICK
This little strategy can try. Use 3 hands in once to double-tap on the display when you view a white screen.Solution Number 5. LIGHT DETECTOR
Perhaps the issue is being caused by the light detector. Available settings that are iPhone and turn auto-brightness choice off.These 5 methods to repair iPhone white screen of death are quite easy, plus the issue will be undoubtedly solved by one.
How to fix Fix IPhone 5 Music Randomly Turns On

Iphone5 is the media telephone that is perfect. If you would like to it's possible for you to tune in to your own preferred songs, and play lists can be created by you on the telephone number. When the telephone is closed at the same time, the the gamer may operate. The audio quality of the participant that is iphone5 is fantastic. Nevertheless, lots of customers complained when the telephone is closed and that the the gamer occasionally at random works also in the event the tune is stopped.
5 means to repair iphone-5 Songs at random transforms on
Solution Number 1: TAKE IT IT AND DELETE YOUR ENTIRE SONGS STRAIGHT BACK AGAIN
Occasionally, a tune in your I-phone can begin enjoying alone, and it was whined about by lots of iphone-5 customers. Among the options is then, to take it it again, and to just erase your entire songs from your apparatus. The issue may be solved by it.Solution Number 2 THE PROGRAMS IN THE BACKDROP
Make an effort to discontinue the applications running in the background manually all. This stops the the gamer to randomly start.Solution Number 3 YOUR HEADSET
For many consumers, the issue may be connected to the headset. Utilize yet another one. The sign they deliver might be incorrect, and that's the reason why the issue happens in case your aged ones aren't functioning correctly.Solution Number 4: PREVENT BANGING YOUR TELEPHONE
Do not tremble the telephone. Should it shakes, it could leap to another tune. In some cases shaking the I-phone often leads to switching on the audio at random.Solution Number 5: RESET IPHONE FACTORY SETTINGS
In case you are distressed by the end, re setting the iPhone to the options is definitely an answer. Start "Settings" then select "Reset" when you tap on "Erase All Articles and Settings" you are going to begin to see the option "Erase iPhone". Wait till telephone system and reveal the fresh set up display that is recognizable.Ideally, these 5 methods to repair methods Songs that is iPhone at random turns on can help you to eliminate issue forever.
Step by Step How to Fix IPhone 5 And 6 Instagram Freezing Issue

Instagram is internet software which is popular around the planet and outstanding cellular. Instagram is some sort of social-network with about 100 thousand active customers, for sharing pictures worldwide, celebs and everyday folks. It's extremely user friendly. You will not neglect to notice the fascinating and special minutes because you'll be able to shoot pictures together with your cell device. Instagram enters the picture, letting you use various image filters give a specific arty appearance to them and to enhance them, after shooting the picture. For a lot of iPhone users, Instagram is no longer working functioning therefore flawlessly, because they and program cold issues are frequently struggling. Here are FIVE ways to repair iphone-5 and 6 Insta-Gram cold problem in case you are thinking about the best way to remove it.
Solution Number 1. PRESSURE STOP
The most straightforward and primary option you could try, would be to quit the program. Using a double-press on the Home option you will receive the multitasking club. Locate Insta-Gram and hang on it till it then seems minus signal and begins to shake. Harness to shut the program. Then make an effort to open Instagram.Solution Number 2. RE INSTALL INSTAGRAM
For a lot of customers, this option was easy as properly - Instagram reinstall. To erase Insta-Gram push and hold Your Home button, tap on Insta-Gram image till it trembles, and wait. Exploit x to remove it. Then visit Instagram and the app-store.Solution Number 3. UPGRADE
If you are not working the most recent model of the program, Revise Instagram several issues may appear.Solution Number 4. REACTIVATE YOUR IPHONE
Shut your I-phone down away for around one minute. The program will be restarted by it and hopefully it's going to function good.Additionally- Hold and push the Sleep/Wake switch until as well as Your Home button the telephone restarts
Solution Number 5. RE-SET YOUR APPARATUS
Re-set to factory options is something that constantly may repair the issue you're now having with your apparatus if not one of the aforementioned remedies did not assist. Exploit on "settings" in your I-phone and click "general". Scroll to the base and discover alternative "reset". Wiretap on "erase all items and settings" then "erase iPhone". Install Insta-Gram again as soon as you're finished with re-set project.These 5 methods to repair Insta-Gram cold problem that is iphone-5 and 6 are consistently helpful. Begin in the one that is most straightforward, and the program will be fixed by you. It's going to function flawlessly, and you will not be unable to talk about the remaining entire world, as well as your pictures together with friends and family.
Step by Step How to Fix iPhone 5 No Service Fix After Water Damage

Here are processes and some suggestions after is was approached in water, to repair an I-phone. In an outcome, No Support malfunction may seems
Solution Number 1 THE RICE
You'll be able to dry your I-phone with grain despite the fact that this might seem silly. Load the dish with grain, and place your mobile in the pan. Ensure that you combine the grain because that manner, you are going to re-place the grains that acquired the water that is extra with grains that are fresh.5 means to repair iphone-5 no service repair after water damage
Solution Number 2: DATE AND ALWAYS CHECK TIME
They often remove the battery when individuals must dry their telephone numbers. After this, you might see that day and period on the apparatus are incorrect. Place by hand, and the issue may be fixed by that .Solution Number 3 THE SIMULATOR CONNECTION
So that you can wash the SIMULATOR link, ensure that you get rid of cover and rear panel of the telephone back. As soon as you observe the SIMULATOR link, ensure that you wash it softly and gradually.Notice Also- The best way to repair "no subscriber identity module installed" error on I-phone 5
Solution Number 4: AIRPLANE-MODE AND WIFI
Toggle airplane-mode on/off when there isn't any support. If this will not help, hook up to Wireless Local Area Network. Actually these options are easy, subsequently cay me quite useful.Solution Number 5 IPHONE5 SETTINGS
So that you can execute recover, link your iphone-5 for your pc and when the I-tunes seems, in the overview cell click "restore". After re-start, your system transmission needs to be excellent again.Step by Step How to Fix Apple ITunes Error Code 3194

These malfunctions are :
Malfunction 17
Malfunction 1639
Malfunctions 3000-3020
Malfunction 3194
Malfunctions 3100-3999
For the requested build this apparatus is not qualified
Because I-tunes is unable to link to the machine typically, this error turns up. That's essential, since the host is a must for re-storing and software upgrades. Yet, you can find lots of options that are potential, and also the error actually is frustrating, here are FIVE ways to repair Apple iTunes error code 3194.
Solution Number 1 I-TUNES ON COMPUTER
For entrepreneurs, try updating I-tunes on another pc, as well as the answer that is most effective is the pc. It might not run far worse about it.Solution Number 2 YOUR ANTI-VIRUS SOFTWARE
Most of the time, the reason this error happened to begin with lies in your program that is antivirus. Just de-activate this system, with updating as soon as you're completed, trigger it. Ensure that you test in the event specific documents are being blocked by the firewall. Select the choice to let iTunes if this is true.Solution Number 3 CONNECTION
Web connection may be the reason you've got the problem. Try carrying it out in the area without any proxy options in the event the system you're using when attempting to complete the upgrade, h-AS restricted VPN.Solution Number 4: ALTER THE DOCUMENT NAME
Locate a file named "hosts" in windows/system32/drivers/etc. Include the following to the finish of your sponsor document without quotations: "74.208.105.171 gs.apple.com" and click save.Solution Number 5 MINIATURE UMBRELLA
Miniature Umbrella is without making any iTunes malfunctions, somewhat device which will repair malfunction 3194.Download Miniature Umbrella (latest edition).
Link your iOS apparatus to the computer and do not available I-tunes.
Open Miniature Umbrella and push "Begin TSS Server".
Hold the shift-key down and select the firmware. Hold the option key down, in case you are MacUser .
Ideally, among these 5 methods to repair Apple iTunes code 3194 can let you remove the dilemma.
Step by Step How to Fix IPhone 5 Home Button Issue

Solution Number 1. PASSCODE
Click on Options > Passcode > Change Passcode Away. Next activity, change the Pass-Code again, as well as the insect will ideally be-gone.Solution Number 2. HOUSE AND BUTTON
Media "Home" switch once and after that hold the power-button until "Slide to to show off" display appears. Then support the the "Home" option until this display vanishes and then return to your home display.Solution Number 3. ALTER THE HOUSE CLICK SPEED
Among the options would be to improve Your Home Click speed to "slow" from "default" pace. Visit Availability, then select House and alter it.Solution Number 4. RE-SET YOUR I-PHONE 5
A re-set is always the choice. Push and maintain "House" and "Sleep/Wake" switches simultaneously. Then push the "Home" option to check on if it is functioning generally.Solution Number 5. REMOVE YOUR IPHONE
Removing the whole I-phone certainly may if not one of the methods can not aid. Start "Settings" and select "General". On the base discover the "Reset" option and tap on "Erase All Articles and Settings" and support this activity by simply clicking on "Erase iPhone". Await the set up display that is newest.These 5 methods to repair iphone-5 Home Button dilemma with ios-8 are extremely useful, and together, this problem is being solved by customers efficiently.
Step by Step How to Fix IPhone 5 Calls Won’t Answer Problem

Solution Number 1 AWAY
Many consumers noted the problem was eliminated after a few seconds, on-again, and once the power switched off. The measure is easy, and offer a go to it, perhaps it'll benefit you personally too.>Glide across to strength away
Solution Number 2 THE PROGRAMS YOU INSTALLED SOON PRIOR TO THE ISSUE SEEMED
There have now been several many studies that this this problem is being caused by specific programs. In the event you found this problem following install, and installed programs that are particular, make an effort to eliminate these programs, and see if this helps.Trunk IPhone into secure mode
>Hold the power and house button together, until you start to see the display goes blank.
>Eliminate your hand at house option while keep pressing the power-button.
To Exit mode that is safe, whatever you must do is restart
Solution Number 3 THE DISPLAY DEFENSE FOR THOSE WHO HAVE IPHONE5 SITUATION AS WELL, AND IT
Actually if this seems odd, the instance along with display defense are perhaps creating this this problem. Remove, and find out whether it aids.Solution Number 4: CHANGE TELLINGS OFF
The higher, less tellings. At least for a few consumers, because this helped the issue to be solved by them . To be able to achieve this, visit Options, and select Tellings. In Notice Center, select Away.Solution Number 5 UPGRADE
After you execute the iOS upgrade to the most recent version oftentimes, the issue vanishes. Make an effort to do so it'll meet your needs.As soon as you try these 5 methods to repair iphone-5 calls will not reply trouble, you may attempt to reset your device to factory settings. See among the Apple stores if this doesn't really help possibly, and change these devices.
Step by Step How to Fix IPhone 5 Emails Not Being Pushed
Consumer gripe about E-Mails Not Being Shoved:
I've found that my e-mails aren't being shoved to my post program mechanically. I 've it put up for evey 1-5 minutes plus and it is set on the attribute that is shoved
Solution Number 1 IF THE DRIVE IS ON IN THE GET FRESH INFORMATION SECTION
So that you can examine out this, visit Diary, Contacts and Mail. Select Bring In New Data alternative. Drive should be on.Solution Number 2 TOGGLE MODE
Try toggling the Airplane-Mode. For a lot of customers, the issue was fixed by this easy measure, and e-mails is going to be shoved again.Solution Number 3 POST PROGRAM
Occasionally, the re-start of the program might aid. Push Home switch quick, twice. You are getting the survey of the programs you employed. So that you can find post program swipe left. Swipe onto it as soon as it is found by you, and shut it. Wait 2 or a moment, and change the program on-again.Solution Number 4: UPGRADE THE EMAIL PROGRAM
By way of example, if G-Mail is being used by you, ensure your program is updated. Otherwise, ensure that you upgrade it. Oftentimes, the problem will be fixed by that.Solution Number 5 YOUR APPARATUS
In case you employed your device for times with no system, it could slow down the telephone number, and trigger the the problems like that one. Re-boot your iphone-5, if the issue is finished and see.>Glide across to strength away
>When the unit is off, push and hold the Sleep/Wake button
Move when desired, attempt all 5 methods to repair I-phone E-Mails not being shoved, and step-by step. Just in case you're not in a position to resolve the problem, or if it is solved by you, however just briefly, ensure that you make contact with Apple help.
Step by Step How to Fix iPhone 5s Home Button Not Working
Solution Number 1: Home Button recalibration
Select one like program, or Time, for instance, of the programs that are iOSWhen that takes place, again, hold and push the power-button before you view Your Home display again and until the slider vanishes
Solution Number 2: Reboot your iPhone
Re start may assist virtually constantly when encountering problems in your device. Push and hold when the slider appears, and the sleep/wake switch, pull it and turn your telephone number off.This is that which you need to strive: drive it upward gradually so that you can use some stress, and plug the connector into your iPhone 5s. This could function, as the connector is found right underneath the the House button, so when it is moved by you, the switch may be moved by it and correct it.
Solution Number 3: Clean the Home Button
House switch may quit functioning generally after some time period, because it can be damaged by several various matters, including soil and the dust. To repair I-phone 5 s use isopropyl alcohol house button and clear it, however do this carefully and softly. Take into account that when the switch is functioning, you need to wait for several moments to find out.Solution Number 5: Re-Set the settings
This can look at as properly:Select Reset ">> Reset all Options.
Several customers fixed the glitch with your 5 methods to repair I-phone 5s house button no longer working functioning. In the event you did not, you may empower the onscreen option, therefore you may utilize your I-phone 5s usually till you get their support and see the Apple.
To accomplish this,
visit Options ">> General ">> Availability, and pat on Assistive Touch. Change it it on, and you will notice House choice on the monitor. By doing this, you'll have house option that is digital.
Step by Step How to To Fix iPod Error 1428
 Usually, by using iTunes upgrade or to recover your iPod, there will likely be any type of bugs or no malfunctions. In situation one appears, you will need to repair it and you will not be unable to carry on. Among the errors which will appear is the I pod luckily as the rest of the malfunctions, although malfunction 1428, it could be fixed with a couple easy options. Some thoughts were discussed by us, and all 5 methods to repair iPod malfunction 1428 are given below.
Solution Number 1 YOUR IPOD
We always focus on the remedies which need one minute of of energy. In this instance, we suggest that you just attempt together with the re start first. Push and hold the power-button (sleep/wake switch), so when slider appears, pull it to electricity away. Again push exactly the same switch once your iPod is off, plus it'll reverse on. Try recover or to upgrade again.Solution Number 2 YOUR COMPUTER
Exactly how many instances a problem was resolved by you together with the re start on your own personal computer? We wager a great deal. That's just why it ought to attempt today and that is the reason why it's contained as among the 5 methods to repair iPod malfunction 1428. Only reboot your pc. Possibly you will not must attempt any other option, because the issue may be solved by this.Solution Number 3 Hardware DEVICES YOU DO NOT WANT AT THE SECOND
That is just another alternative that is really easy. The thing you must do here to disconnect Hardware devices you do not use right now, which indicates you should disconnect everything except mouse and your computer keyboard. Several consumers who'd the exact same difficulty documented this remedy was the repair for I pod malfunction 1428. Ensure that you try out it.Solution Number 4: UPGRADE I-TUNES APPLICATIONS
It is crucial to upgrade I-tunes first if you want to upgrade or restore your I-pod, or any iOS apparatus. Recall this for the period that is next. Today, as a way to upgrade it, follow these measures:Apple Macintosh - Open the program, and select iTunes in the menu-bar. Pick Test for Upgrades.
Windows - Open the applications, and select Assistance in the menu-bar. Pick Test for Upgrades.
Attempt again, when you upgrade the application, and ideally the malfunction will probably be-gone.
Solution Number 5 SOFTWARE
They're surely incredibly irritating and time eating dilemma, although malfunctions during restore or upgrade aren't some thing you'll encounter too frequently. Attempt safety applications related remedies, in the event the preceding alternatives failed to fix the issue. Here's that which you must do:Upgrade protection applications - set it up, download and observe when there's a brand new variant of the applications accessible, and if there's. Proceed to another one in the event the error remains.
Switch off the app - just try upgrade or to re-establish again, and change off the app.
Eliminate from your own personal computer.
Subscribe to:
Posts (Atom)